Continuity assessments. What can I say, I hated it. I hate all kinds of assessments as I find them incredibly stressful. This one more so than others as to be truthfully honest I didn't really do a whole lot of practice so everything I was doing I was kind of winging it. Yes I had practiced doing each thing individually but never as a whole thing, so I wasn't really sure of the timings.
So there I was dressed in black, with my model in front of me, make up all set up and Sue starting the countdown as to when we could start and I realised that I really should've practiced more and I had no clue as to what to do first. I ended up starting off with putting the rollers in the front parts of the hair. I then moved onto the face and placed foundation around the face and the neck of my model. I then added in the grey tones under the cheekbones and around the eye sockets. I tried to make the eye sockets slightly darker so that they looked even more sunken in. I then moved on to trying to place the wax for the Vampire bites. This is where I screwed up. I had only practiced on my hand and not on a neck so I didn't realise how hard it was to try and position it without hurting my model. Then trying to get the colour on it and trying to make sure everything was blended was incredibly difficult due to the placement. By this point I only had about 40 minutes left to finish off the hair and add the blood to the lip. I thought I could do it easily in that amount of time. Boy was I wrong! I was rushing to get all the hair curled, because me being stupid chose the harder of the designs to do and trying to get all the hair curled and pinned meant that I didn't get any photos of where I pinned the hair so I would have to hope for the best next time. I had to swipe a quick line of blood across the lip to finish of my look and get it photographed. Overall it was a incredibly stressful process and I wasn't completely happy with the out come because I had to rush everything. I am glad that I chose the designs that I did because I think that they really fit in and suit the character that I had chosen but I think due to me not practising enough I found it really difficult to portray the designs properly.
Thursday, 14 April 2016

Wednesday, 13 April 2016
Vampire bite
After testing out the cut throat I decided it would be best to try and create the vampire bites just to make sure that I would be able to do them quickly and easily to the best of my ability in the allotted time.
So the first thing that I did was to create a small ball of wax and place it on top of my hand. I then gently blended out the edges so that it looked as thought there was a small lump on my hand. Now as I was doing this on myself I found it rather difficult to blend the edges without moving the wax ball. Once the edges were blended out I used the pallet knife to create a small indent in the middle of wax so that it looked as though something sharp had pierced it creating the vampire bite effect as I like to call it. I then added some foundation over the top so that it almost blended in with my hand. The next step was to slowly start to build up colour around the wound. I tried to make it so that there was a thin layer around the edge and that it got darker towards the indent. I then placed a small amount of wound filler into the indent and added some blood to make it look slightly more realistic.

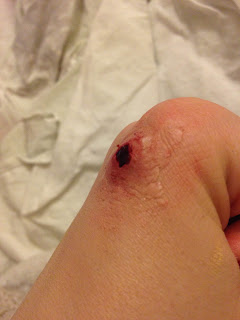
So the first thing that I did was to create a small ball of wax and place it on top of my hand. I then gently blended out the edges so that it looked as thought there was a small lump on my hand. Now as I was doing this on myself I found it rather difficult to blend the edges without moving the wax ball. Once the edges were blended out I used the pallet knife to create a small indent in the middle of wax so that it looked as though something sharp had pierced it creating the vampire bite effect as I like to call it. I then added some foundation over the top so that it almost blended in with my hand. The next step was to slowly start to build up colour around the wound. I tried to make it so that there was a thin layer around the edge and that it got darker towards the indent. I then placed a small amount of wound filler into the indent and added some blood to make it look slightly more realistic.


Cut Throat
I decided to practise doing a cut throat so that if I chose that to be my final design I would have an understanding of what to do and how best to do it.
The first thing that I did was to add a very thin layer of barrier foam just in case my model had any reaction to the products. I decided to use Sculpting wax as I thought it would be easier to use than Gelatine. I placed a large amount of wax into the back of my hand and using a pallet knife, warmed up the wax slightly so that it was more pliable and easy to work with. Trying to then place it on the neck was incredibly difficult. There were quite a few times that I got incredibly frustrated with it as it either kept sticking to the pallet knife or my fingers. After a while of trying to get the wax on I finally succeeded. I originally placed a long line along the neck and then used the pallet knife and dragged it along the middle to create the cut effect. More frustration occurred when doing this. The next step was to add a thin layer of latex over the wax so that when it came to adding colour it wouldn't ruin the shape of the wax. I then finally started to add colour. I started off using a light shade of red around the outside and started to build up the colour the more towards the middle of the cut. I found that I struggled to blend the colour without ruining the latex. I then added a small amount of wound filler and some blood to help make it look a little more realistic.


The first thing that I did was to add a very thin layer of barrier foam just in case my model had any reaction to the products. I decided to use Sculpting wax as I thought it would be easier to use than Gelatine. I placed a large amount of wax into the back of my hand and using a pallet knife, warmed up the wax slightly so that it was more pliable and easy to work with. Trying to then place it on the neck was incredibly difficult. There were quite a few times that I got incredibly frustrated with it as it either kept sticking to the pallet knife or my fingers. After a while of trying to get the wax on I finally succeeded. I originally placed a long line along the neck and then used the pallet knife and dragged it along the middle to create the cut effect. More frustration occurred when doing this. The next step was to add a thin layer of latex over the wax so that when it came to adding colour it wouldn't ruin the shape of the wax. I then finally started to add colour. I started off using a light shade of red around the outside and started to build up the colour the more towards the middle of the cut. I found that I struggled to blend the colour without ruining the latex. I then added a small amount of wound filler and some blood to help make it look a little more realistic.


In photos it doesn't look as bad but you are still able to where the edges of the latex are. On the first image you are able to see a slightly darker patch, which is where I accidentally placed a small black patch and wasn't able to completely get rid of it! However due to the amount of time that it took to do I don't think that I will be using this as my final design!!
Hair Chart 2
My second hair is also very similar to the first one. The only thing that I changed was the fact that the top half of the hair is in a plait wrapped around to form a bun. I would then curl the bottom half and pin it so that it frames the bun. I changed the idea slightly because it may be slightly difficult to keep up with continuity and also because time might be an issue. I am not as big of a fan of this design as I am of the first one but I think it still fits in with the character and the era that it was set in. (Again you'll have to excuse my drawing skills!)


Face Chart 2
For my second face chart I decided to try and keep it as similar to the first one as possible. I liked the idea of having the gaunt look to my character but due to timings I'm not too sure how quick the cut throat will take so I made a slightly easier version. Rather than having my designed my character after death, I decided to do it right before. So the gauntness is still there but rather than having a cut throat there are a set of Vampire bites. I think this look works just as well because it fits in slightly more with image of Vampirism. I don't think I explained it on my last face chart post but I decided to have blood dripping down the lip as I feel that it makes it a little more obvious as to the mythical being that I am trying to portray.


Hair Chart 1
When it came to designing my hair chart I had to make sure that it fit in with the era that the book was set in. Dracula was written so that it was set in late Victorian times meaning that the hair was a lot looser around the face and that more of it was up rather than down. I decided to take inspiration from the film rather than the book as I was able to get a better representation of what Lucy should look like.


Now you are going to have to excuse the horrific drawings, unfortunately I'm not the best artist! The look that I was trying to convey was to have the back of the hair up and completely curled. I would then pin certain curls in a few places near the top of the head. I would use rollers to create the front parts of the fringe and also pin those back. In the film Dracula, Lucy often had her hair down and in both the book and the film she was seen to have had curls so I thought it would be good to include this in my design.
Face Chart 1
So I started to think about ideas for what I could do for my character. Lucy Westenra was a high class female in society, however in unfortunate events Lucy was turned into a vampire!! I wanted to try and keep to the idealisations thought about vampires, so things like pale skin, smooth skin, pointy teeth and just overall looking flawless. However I also wanted to try and keep to close to the book, so Lucy unfortunately had her head cut off to make sure that she was officially dead in the vampire terms. So I tried to base my character around the dead version of Lucy.


This is the basis of my first look. I wanted to include the slit throat as it links to Lucy's character but I also want to try at having a go at something slightly different. I think I am either going to use Gelatine or Sculpting Wax to create the cut and then add on the colour. I wanted to create slightly sunken in cheeks and eyes to create an effect that made her look as though she was dead. After bravely scouring through images of dead people and make up styles I came up with an in between version so that it wasn't over the top but it still had an effect. Apart from the throat, I wanted to keep my design simple so as I only have a short amount of time to get both the hair and the make up done and I don't want to be rushing.
Subscribe to:
Posts (Atom)